
Advancement in camera technology has opened new opportunities for photography formerly reserved for NASA. The latest high resolution cameras allow for quality images even when shooting long exposures at high ISO settings which are necessary for Astro-photography. Constantly improving digital post processing applications further improve image quality and allow for new creative opportunities. Night sky photography requires a sound understanding and ability to adhere to precise techniques that can seem overwhelming at first but can be quickly mastered with a bit of practice.
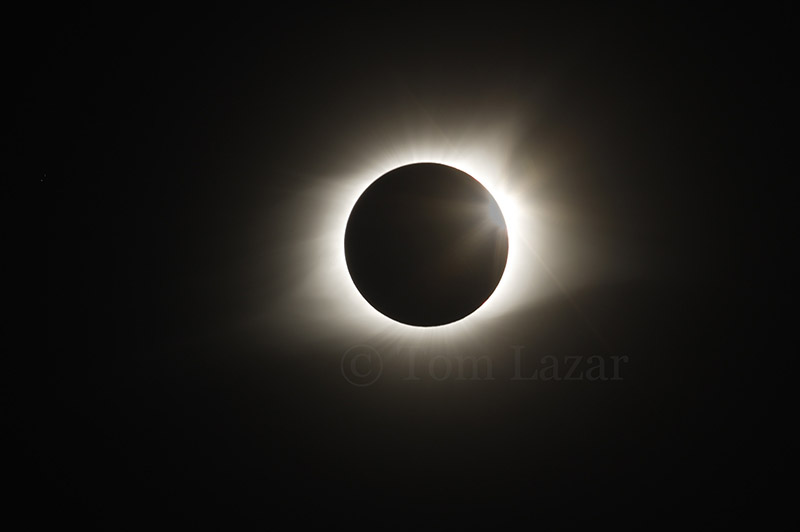
“Two Minutes 39 Seconds” – Total Solar Eclipse
While not actually a “night” event the total solar eclipse millions of people witnessed a few years ago and I photographed sparked my interest in nighttime photography.
What equipment do you need? First the basics for all landscape photography including a quality camera, wide angle lens, and a sturdy tripod with rotating ball head. I recommend a full frame higher resolution camera that will produce higher quality images with less noise (graininess) which can be a problem with night photography. To avoid super long exposures, you will need to shoot with your lens wide open so a wide angle with at least a f 2.8 minimum aperture is recommended.
My typical exposure when photographing at night is between ten to fifteen seconds so shooting on a tripod is mandatory.
Important added equipment for night photography includes a variety of lighting tools, a panoramic head, and one of several available APPs for locating and identifying features of the nights sky. I carry multiple lights when out at night including a headlamp and a more powerful flashlight to get where I need to go safely. Then when photographing, smaller lowered powered lights so my eye can quickly adjust to changes in light levels. A low powered red light can be used to further reduce the adjustment time if it is sufficient to see and adjust camera settings.
Portable lights can also be used to add light to foreground objects to make details more visible in final image. Afterall, you are shooting in almost total darkness when the moon is not up, and you have found a great “Dark Sky” location to create your image.
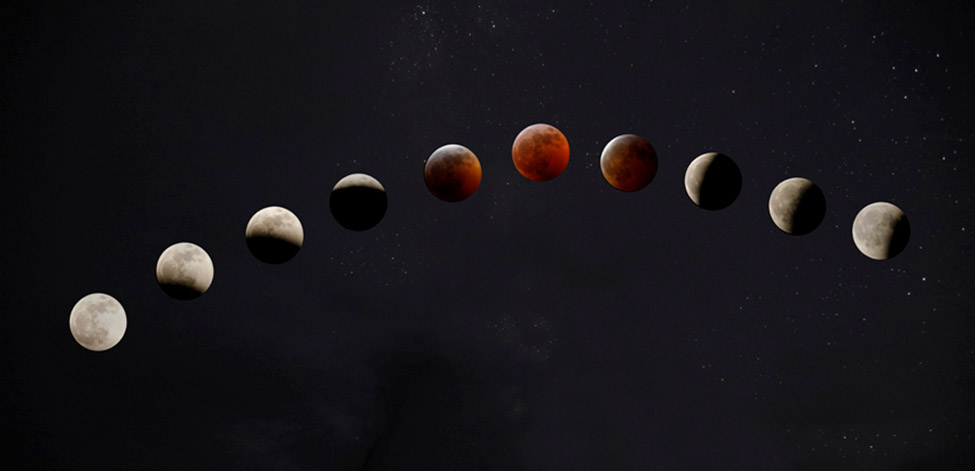
“the End of the World” – Total Lunar Eclipse
One of my first truly night photography attempts. It was after capturing both a solar and lunar eclipse I decided to research and photograph the night sky throughout the year.
The number of APPs related to the night sky is ever increasing. I suggest getting ones specially aimed towards photographers. I use three. Light pollution map allows me to find dark sky locations. Sky Guide is an inexpensive and simple to use APP that I use for quick night sky references. PhotoPills is an advanced APP that provides numerous planning tools to photographers for both day and nighttime photography. It allows you to determine what the night sky will look like at any location at any time of the year. By using your phones camera, it also allows you to see where sky objects will be at night when scouting locations during the day. This may seem like cheating, but it is never that easy in the field.
PhotoPills is also a great learning resource. They have both YouTube and written tutorials on how to use their APP to plan and create striking images. Many specifically aimed at night photography. Outdoor Photography website and magazine is another great resource. A paid membership will give you access to some of their more detailed “How To” night photography articles. There are numerous other sources of information available online. It can become overwhelming and many are repetitive. My advice is get the basics, then get out in the field and give it a try. The best way to learn is by doing. It can be a lot of fun too, as long as you remember to take your midday nap!